How to Remove Ceramic Coating from a Car
Ceramic coatings are the best way to protect your vehicle’s paint from UV rays, bird droppings, acid rain, tar, tree sap, bug splatter, and a host of other contaminants. They produce an invisible physical layer on top of the paint, repelling rain and water and preventing dirt and grime of any sort from sticking to the surface.
One of the major benefits of ceramic coatings is they last a long time – usually a minimum of 12 months.
But what if you want to remove a ceramic coating for whatever reason? One of these reasons would be vinyl graphics installation. Well, you are up for a challenge. Ceramic coatings are an absolute nightmare to remove.
Preparing The Car For Ceramic Coating Removal
Meticulous cleaning is always required. You’ll be surprised how much dust, dirt, airborne pollutants, and contamination there is on your car.
Step 1: Rinse The Vehicle
Rinse the car first to wash away all loose dirt. Use light pressure to prevent propelling hard mud and debris at high speed toward the surface of your paint when you do that
Step 2: Decontamination
After rinsing, even if it looks like the car is perfectly clean, there’s going to be a number of particles still lodged in the surfaces and pores of the paint. We’re talking about mineral deposits, salts, iron dust, leftover grease and grime, tar, etc. There’s all kinds of contamination picked up from the surrounding environment.
Decon Soap is an all-in-one product that not only acts as a car shampoo, but also a contaminate remover. It’ll remove everything from your wax layer, all the way up to brake dust, grime, bug guts, iron, and more. If you did not use Decon Soap in the previous step, you’ll have to look for individual decontamination products. It might even be enough to get your ceramic coating off if it has degraded enough.
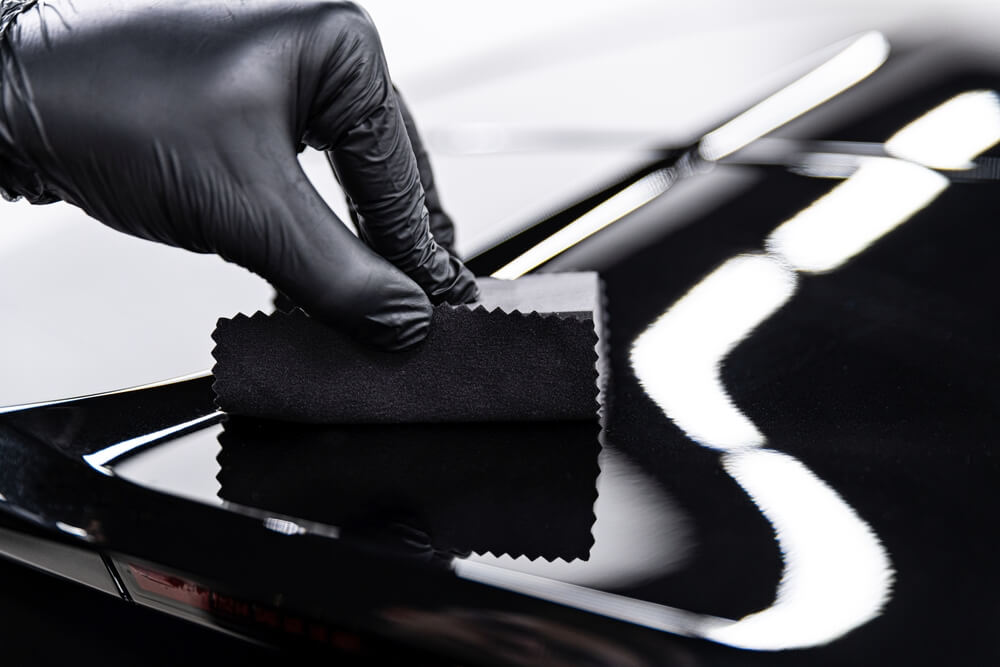
Finally, after chemically removing all possible contaminants, it’s time for a clay bar pass. Our Clay Decon kit includes all you need to complete this step. Instead of a typical clay bar, we include a clay pad. It’s a lot easier to use, more durable, and it can be used up to 100 times. A clay bar must be thrown out if you drop it on the ground. A clay pad can simply be washed off with the included clay lube and you’re good to go!
The clay bar will pick the majority of these bonded contaminants and leave the surface as close to perfect as can practically be achieved. Remember to use lots of clay bar lubricant to keep the surface wet at all times. Use light pressure and fold your clay over frequently to expose a fresh surface. Using a clay bar without a clay bar is like shaving without shaving cream. You need the lubrication to avoid causing damage.
REMOVAL
Method 1: Chemical removal of ceramic coatings
We mentioned already that ceramic coatings are very resistant to chemicals. However, that’s not entirely true in all cases. Ceramic coatings fare extremely well against acids and salts, which are the majority of chemicals the vehicle will encounter out in the environment.
However, on the opposite side of the pH scale, alkaline products such as degreasers will attack the ceramic coating aggressively and break down its bond with the surface, making it easier to remove.
WARNING: Your clear coat is just as vulnerable to alkaline products (degreasers, brake cleaners, etc.) as the ceramic coating is. If you use too strong a product or let it dwell on the surface, it can eat through the coating and attack the clear coat and underlying paint layers. If not used carefully and with utter attention, alkaline products can damage and compromise your paint irreversibly.
With that in mind, you can mix a DIY solution of wheel and brake cleaner diluted 5:1 with ordinary water. Mix thoroughly in a spray bottle and spray on the body panel.
While it’s still wet and soapy, pick up a new piece of clay and clay the surface, agitating the product. Make sure to work quickly and use light pressure. When you’re done, rinse thoroughly with a power washer.
In a 5:1 solution, the wheel cleaner should be fairly harmless to your paint. Still, you don’t want it on the surface a second longer than it needs to be. It’s always a good idea to test in an inconspicuous place first.
When you think you’re done, test the ceramic coating again to see how much you’ve removed. Watch the video below to see how it’s done.
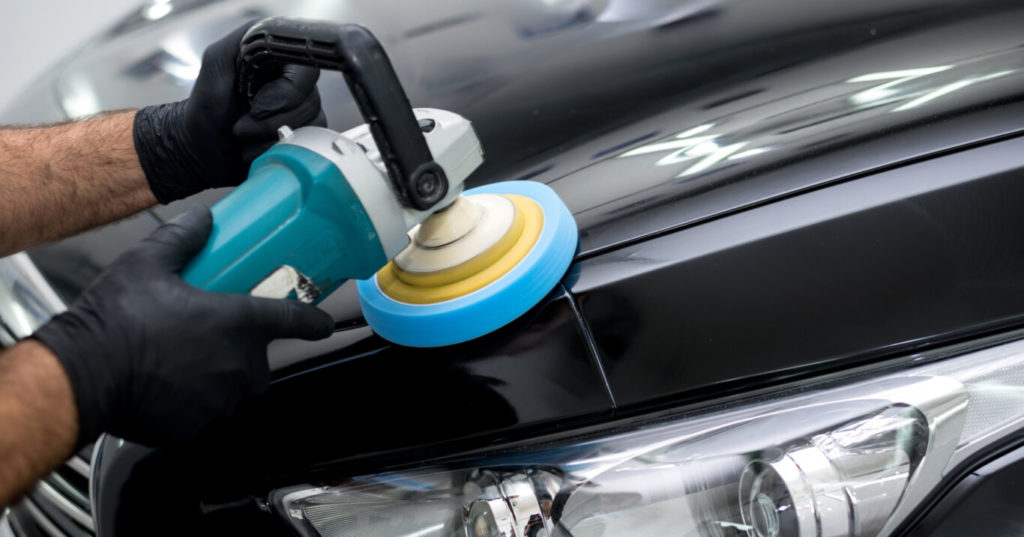
Method 2: Polishing off ceramic coatings – PREFFERED WAY!!!
The only universally accepted method to remove ceramic coatings is mechanical abrasion. Since the ceramic coating is a physical layer, polishing is the only surefire way to remove it 100% and expose the clear coat underneath.
In fact, many of the high-grade professional ceramic coatings claim the only way to remove them is through machine polishing.
If you’re removing the coating because of bad application, analyze the coating for high spots and abnormal thickness. If such are present, you want to wet sand them by hand before taking out the big gun.
Use fine sandpaper and a fair amount of lubricant on the surface. Start with 3000 grit and, if necessary, move down to more aggressive grit until you see the ceramic coating wearing off. Just be careful to not eat into the clear coat.
After all the high spots are addressed, the rest of the process is the same as polishing an uncoated vehicle.
- Grab your random-orbit machine polisher and equip it with a medium cutting pad and a medium to light polishing compound.
- Apply an appropriate amount of compound to the pad, following the product’s description.
- Dab the surface several times to spread the paste, and start the machine on the lowest setting to evenly apply it across the body panel.
- Then, switch to a higher setting and begin polishing. Move the machine approximately 1 inch per second. Don’t let it sit in the same spot to prevent overheating the area and marring the surface.
- Buff out the panel and inspect the result. Test the coating to see if it was completely removed.
- If you don’t like the result, you can step down to a more aggressive polishing compound. However, you will most likely need to perform a second pass with a lighter product to remove the scratches left by the previous operation.
- Polish the clear coat until you’re satisfied with the surface quality.
After polishing the vehicle, it should be 100% free of any ceramic coating.